Use this guide to update a reader’s Group in Device Manager.
You may need to update a reader’s Group if the reader is being used for a different workflow, such as moving from Transportation to Attendance, Cafeteria, Campus Access, or another workflow.
The Group is linked to the reader’s configuration. This means the selected Group determines how the reader’s tap event data is processed and where it appears.
TABLE OF CONTENTS
- Before you begin
- Sign into CI Solutions
- Select the reader
- Open the edit readers window
- Update the Group or create a new Group
- Save the changes
- Move the reader, if needed
- Confirm the reader's new Group
1. Before you begin
Make sure you have:
- Your CI Solutions login credentials
- Access to a desktop computer
- Note: Reader settings cannot be updated on a mobile device.
- Access to Device Manager
- The serial number for the reader you want to update
- The serial number can be found on the label on the back of the reader.
- The new Group information for the reader
- Physical access to the reader so it can be moved to its new workflow area, if needed
A reader must be configured for the Group it will be used in. For example, you can update a reader’s Group to Library in Device Manager, but unless that reader is configured for use in a library workflow, the tap event data it captures will not display correctly.
Step 4 explains how to select or create a new Group label in Device Manager. However, creating a Group label does not create the configuration required for the reader to operate in that Group. Contact CI Solutions to request a new configuration.
2. Sign in to CI Solutions
- Go to the CI Solutions login page on a desktop computer.
- Enter your credentials.
- Select Device Manager.
3. Select the reader
- Find the reader you want to update.
- Select the checkbox to the left of the reader number and status.
4. Open the Edit Readers window
- Click the pencil icon above the reader list.
- The Edit Readers window will open.
5. Update the Group or create a new Group
- Open the Group dropdown.
- Select the Group that matches the reader’s workflow.
The Group identifies the workflow or area the reader belongs to, such as:
- Nurse’s Office
- Cafeteria
- Attendance
- Campus Access
- Bus
The selected Group determines how the reader’s tap event data is processed and where it appears.
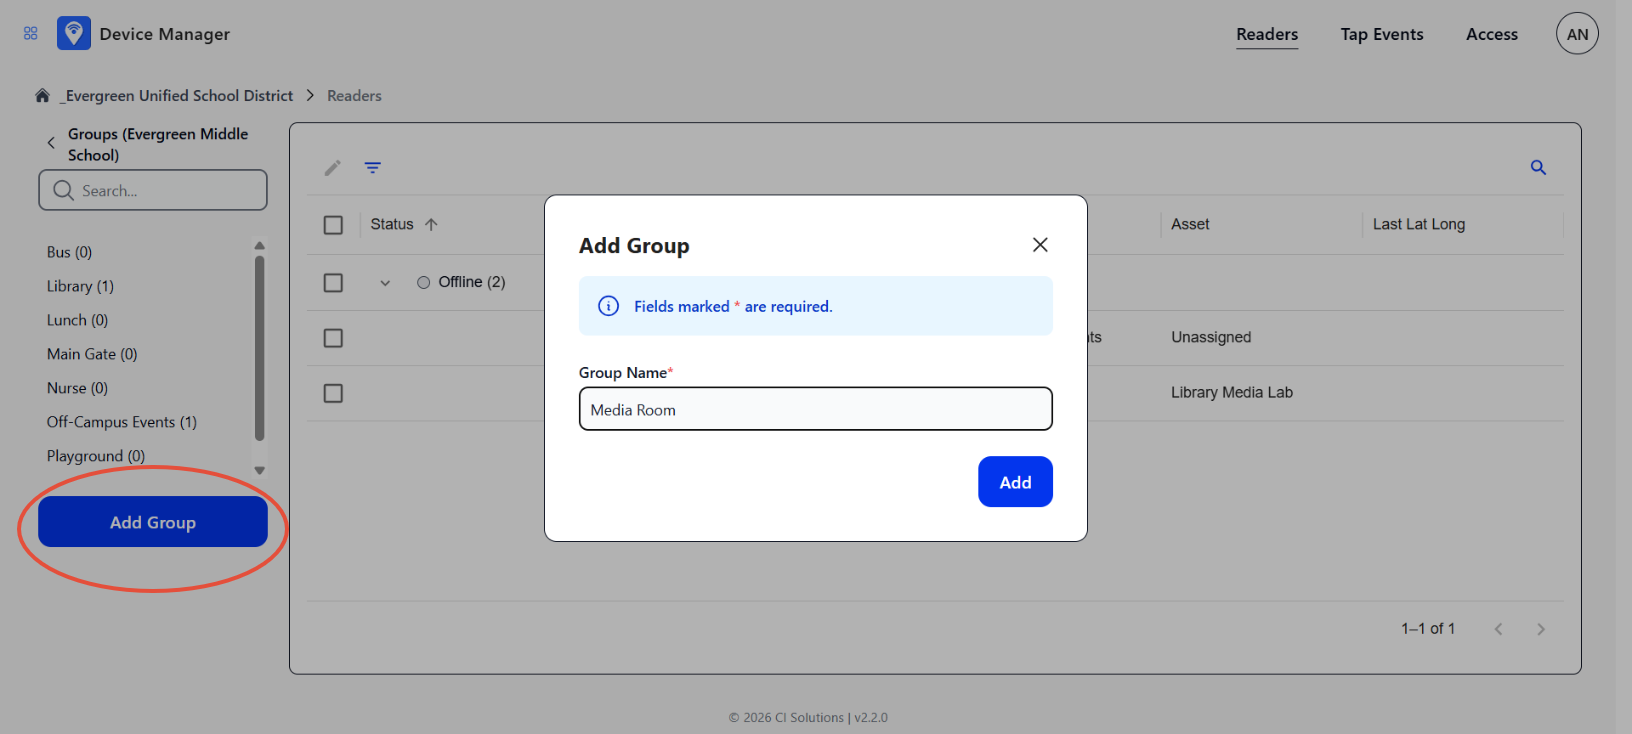
If the Group you need does not appear in the dropdown, you can create a new Group label in Device Manager.
- Close the Edit Readers window.
- Select the reader’s assigned Location from the Locations list on the left side of the reader panel.
- Click Add Group to the left of the reader list.
- Enter the Group name.
- Click Add.
- Return to the reader.
- Open the Edit Readers window again.
- Confirm that the correct Location is selected.
- Select the new Group from the Group dropdown.
Note: Creating a new Group label does not create the configuration required for the reader to operate correctly in that workflow.
If the reader has not already been configured for the new Group, contact CI Solutions to create or update the required Group configuration.
You may continue updating the reader’s Location or Asset, if applicable, but the reader’s tap event data may not display correctly in the new Group until the configuration is complete.
6. Save the changes
- Confirm that the correct Group is selected.
- When changing a reader’s Group, you should also review and update the Asset so the reader’s specific placement matches the new workflow. Click here for instructions on how to update the Asset.
- Click Update to save the changes.
7. Move the reader, if needed
After saving the updated Group, physically move the reader to its new workflow area if it is not there already.
Once the reader is placed in its new workflow area, connect it to power.
For additional installation instructions, see How to set up a reader in Device Manager.
8. Confirm the reader’s new Group
After saving the changes and moving the reader, if applicable, confirm that the reader appears with the correct Group in Device Manager.
- In the Locations list on the left side of the reader panel, select the reader’s assigned Location.
- Confirm that the reader appears in the reader panel.
- Confirm that the reader shows the correct Group.
- If available, test the reader in its new workflow using an approved ID card.
Group update complete
The reader’s Group is updated when it appears in Device Manager with the correct Group assignment.
Note: If the reader was assigned to a Group it had not previously been configured for, the reader’s tap event data may not display correctly until CI Solutions completes the required configuration.
Was this article helpful?
That’s Great!
Thank you for your feedback
Sorry! We couldn't be helpful
Thank you for your feedback
Feedback sent
We appreciate your effort and will try to fix the article