Update Layout
1. Unzip and extract the files (Background and CIBcards83.mdb)
2. Navigate to C:\CI Solutions\CI Badge\Data > make a copy of CIBCards83.mdb
3. Open the original CIBCards83.mdb
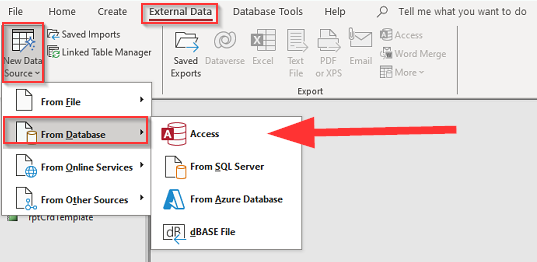
4. Click External Data > New Data Source > from Database > Access

5. Locate your downloaded CIBCards83.mdb
6. Select Import tables, queries form, reports... > Click OK

7. Click on the Report tab
8. Select your reports you want to import > Click OK

If the name of the report is the same, it will import and add 1 next to the name.
You can delete the original reports that are not named with "1" and remove "1" from the copies.9. Right-click the report > Select Design View

10. Click Page Setup > Page Setup > Page > Printer... > select your printer > Click OK

11. Navigate to Print Options > Click OK

Ensure margins are set to 0.
12. Right-click the title bar > Click Save > Close

If you have additional layouts to add, repeat steps 9-12.
Add Layout in CI Badge
1. Open and login as Admin in CI Badge
2. Click Settings

3. Navigate to the Layouts tab > Double-click the report
4. Assign an user friendly name for your layout

5. Choose a personality where the layout will be available

6. Select the assigned printer and click Save Layout Info
If you have additional layouts to add, repeats step 1-6.7. Click Exit to return to the Data Entry Screen

Now you are able to select a student and print your desired layout. 
Was this article helpful?
That’s Great!
Thank you for your feedback
Sorry! We couldn't be helpful
Thank you for your feedback
Feedback sent
We appreciate your effort and will try to fix the article