The Bulk User Upload feature allows Badge Owners to quickly create multiple user accounts by uploading a formatted CSV file. Each row in the CSV corresponds to one user account. This guide covers where to find the feature, the required and optional fields, formatting rules, and the validation logic applied during upload.
How to Upload Users
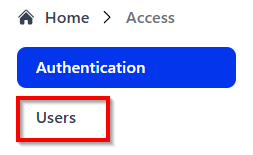
Click on Access in your admin dashboard.

Click Users.
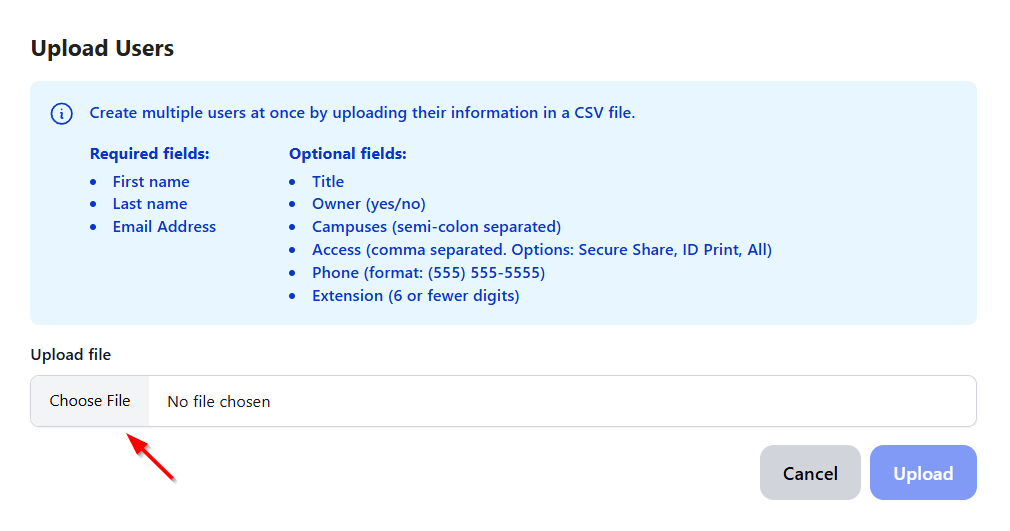
Select your CSV file containing user data.
Click Upload to process and create accounts.

CSV Format Specification
| Field Name | Required | Default Value | Format / Notes |
|---|---|---|---|
| First Name | Yes | — | Any non-empty string |
| Last Name | Yes | — | Any non-empty string |
| Email Address | Yes | — | Must be a valid, unique email address not already in use |
| Title | No | None | Freeform string |
| Owner | No | no | yes / no (case-insensitive). yes grants full access and all campuses |
| Campuses | No | All | Semicolon-separated list of campus names. e.g., Campus A;Campus B |
| Access | No | All | Comma-separated: ID Print, Secure Share, or All |
| Phone | No | None | Format: (555) 555-5555 — required if MFA is enabled |
| Extension | No | None | Digits only, up to 6 characters |
Note: If Owner = yes, the Badge system automatically sets Access = All and Campuses = All.
Validation Rules
Required Fields
First Name, Last Name, and Email Address must be present and non-empty.
Email must:
Follow valid format
Not already exist in the system
Be unique within the uploaded file
Phone Number
Required if MFA is enabled for your organization.
Must match U.S. format and be convertible to E.164 internally.
Invalid numbers (non-digits, wrong length) will be rejected.
Extension
Digits only, maximum 6 characters.
Empty values are allowed.
Owner Role
Acceptable values:
yes,no, or blank (treated asno).yesassigns the Owner role and overrides all access/campus restrictions.
Campuses
Must match known campus names exactly (case-insensitive).
Blank or “All” grants access to all campuses.
Unrecognized campus names will cause row rejection.
Access
Acceptable values:
ID Print,Secure Share, or both.If both are provided, system converts to
All.Invalid values cause rejection.
User Limits
If upload exceeds available user slots, extra rows are rejected.
Rejected rows show reason:
User limit reached.
Tips for a Successful Upload
Download a CSV template HERE.
Double-check for duplicate or invalid emails before upload.
Ensure campus names match exactly with those in your system.
Save your file in UTF-8 CSV format to avoid character encoding issues.
Was this article helpful?
That’s Great!
Thank you for your feedback
Sorry! We couldn't be helpful
Thank you for your feedback
Feedback sent
We appreciate your effort and will try to fix the article