Setup to LAN
Click here to download the 8300 Status Monitor1. Open the downloads folder > Click Install.exe and Run as Administrator

2. Connect the USB and power on the printer to your computer
3. Open the 8300 Status Monitor app and Run as Administrator

4. Click on the Printer Select tab > Select Use the following IP address > Enter your IP Address
5. Click Update > Click OK to save the settings


6. Turn off the printer and disconnect the USB and connect the RJ-45
7. Turn on the printer
Wait for the printer to be pingable
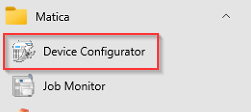
8. Click on the Start Menu > Click Device Configurator
9. Click New Printer > Select your printer device > Click Next

10. Select your model > Click Next

11. Select LAN > Enter the IP address you assigned for the printer > Click Next

12. Leave the default printer name > Click Next

13. Confirm the IP information > Click Finish


14. Open the Job Monitor app > Check the status of the printer

Was this article helpful?
That’s Great!
Thank you for your feedback
Sorry! We couldn't be helpful
Thank you for your feedback
Feedback sent
We appreciate your effort and will try to fix the article